Total Pageviews

Friday, August 30, 2013

Multitasking - a new era

MULTITASKING is my best friend. Not in the sense that I'm super efficient at it, but in the sense that I would love to actually use it effectively and I constantly think about ways to do more during the day. Well, I'm going to implement some of those in the coming weeks. Perhaps, when all is said and done, I'll be able to legitimately call multitasking my best friend...

THE PICTURE of the woven magazine paper basket on the right is where this whole thought process started. I just happened to see this photo on Pinterest (you can follow my boards here) and accidentally clicked its accompanying link and thought, "how hard could this be?" It didn't help that I've been hoarding magazines since I was like 9 years old. I always think I'm going to do something great with them one day which gives me the necessary justification to keep stockpiling them in places my husband will hopefully leave undiscovered. 

SO FAR, this doesn't seem like a bad thing, right? So far, it seems like I'm following the sort of natural path that every other crafter follows when they get inspired. However, my problem is a long, winding thread that leads back to all of those projects I SHOULD be finishing. Let's start with the most recent endeavor and work our way back...
Crocheted Hexagon Flower Purse


  1. Crocheted Steelpan Keychains - I play in a steelband (no, not heavy metal. Think Caribbean instruments) and have made some really great friends there. I recently thought, in tribute to a ridiculous favor they paid me, that I would make them all a little something cute and crocheted. Not only did I set out to make 3 of these, but I had to actually write the pattern myself. It was just a free floating idea I decided to jump on. THIS is what I should have been doing instead of making woven magazine paper baskets... but wait... there's more!
  2. Hexagon flower purse - approximately a year ago, my mother asked me to make one of these purses for her. I had agreed, of course, and here we are 1 year later. The purse has a good beginning, but I still need to make more hexagons, find a strap, and sew in a lining. A good year's progress... 
  3. 12-foot scarf - A friend of mine found out about a 12-foot Dr. Who themed scarf I was making, and asked me to make one for him as well. It sounded like a great idea at the time. It's knitting, and I'm always excited about new techniques, so I was anxious to sharpen my knitting skills, and I like making things for friends. However, I've probably got 3 feet on that project so far and it was started about a year ago as well... Here's the pattern I'm using...
SO you see, it wasn't very practical of me to have taken up another new, unrelated project to fill my time. 

ANYWAY, back to multitasking...

I THOUGHT that perhaps I could make all of these random craft detours more legitimate if I was able to do two things at once. I work at a public library during the day and I've recently been taking on more responsibilities there. I want to stay current with the literature that we shelve, but have little time between working, performing, and crafting to do that. Then, I had this idea. What if I listen to audiobooks while I craft??? Then, I can multitask my way into thinking I'm being more productive than I really am! It cannot possibly fail! 

AS we speak, I'm transferring Nicholas Sparks' "The Lucky One" to my iPod so that I can run into my craft room, finish my magazine basket, and move on to bigger, more productive things! Wish me luck!

Thanks for reading,

~Paige


Thursday, August 23, 2012

In Progress With No Progress: The WIP

My latest crochet conundrum revolves around the ever present problem I have with "Works in Progress." These, WIPs, as I have recently learned to call them, have two personalities tumbling around in my yarn bag. These personalities work together to pleasantly, and without hesitation, drive me completely insane. Presently, I have just about had it with both sides of the WIP persona. However, that takes some explaining. Let's begin, shall we?

PERSONALITY #1: The Collection

I discovered Personality #1 as soon as I began exploring the art of amigurumi. I learned that with the most basic of crochet stitches and attention to the typical construction of almost every stuffed crochet animal in existence, it was easy enough to deviate from the provided written instructions. I began looking through my pattern books thinking more about how I could adapt or improve a pattern versus which pattern I wanted to try verbatim. And so enters The Collection. Here lies all of the ideas, hastily printed on sticky notes in a sudden moment of inspiration hung on my haphazard idea board, that I intend to make someday. I have purse patterns, amigurumi ideas, necklace possibilities, and a few specific color combinations that have no accompanying details whatsoever. Regardless of their lack of continuity and/or explanation, this random smattering of future projects lies together, harmoniously.

My Idea Board


This particular facet of the 1st WIP personality is not necessarily a bad one. The fact that I can visually appreciate all of the inspiration I have gotten and can be reminded and propelled to new endeavors awaiting the next slip of my crochet hook, is exciting. It's fun to watch the ideas collect. I truly enjoy digging the random notes out of my purse that are barely legible because of either the medium used to take the note (in a few cases I've used gum wrappers) or all of the rogue purse items available to squash and crumple the needlecraft message. Whatever the case, I LOVE getting a new idea and posting it to this board. It always makes me feel like I'm going places.


PERSONALITY #2: Easily Distracted

Now we will dive into the second personality. I've chosen a project, ordered the yarn, gathered the appropriate tools and miscellaneous supplies, and am energetically jumping in.

 But wait! What's that over there? Is that an idea for a new, original pattern?

Naturally, I switch gears and begin working both projects at once. I'll make a few granny squares for a purse in addition to adding a few trial rows in my original pattern. No big deal.

Hexagon African Flowers for a purse


Hang on to your hats! There's more!

A quick look at my Etsy Page inspires me to sell the pattern to one of my original projects. That's ok, right? I mean, three projects isn't THAT bad. Plus, two of them are creating patterns. So, we can put them in the same category, right? Good. Those two things merge together so we still only have two projects. Totally doable.

Crocheted Basket Pattern


Jo-Ann Fabrics is having a sale? I am so there!

After a few hours browsing online I've now ordered everything required to learn how to knit socks. Yeah, LEARN to knit socks. It's not like I've done it before and just decided to knit some more. I chose to take on the task of learning to knit socks from square one on top of all of my crochet projects.


Newly Purchases Sock Making Supplies
Well, since I am on the Jo-Ann's website, I might as well place an additional order for some yarn to start that 12-foot gray scarf a friend asked me to make. 
Men's Scarf Pattern
Free Download: Extra Warm Men's Scarf


So, now I am left with 5 WIPs. On the surface this seems great. It's like, "Wow! I'm so excited to be engaging in all of these projects!" And for a while it's fun as I switch from project to project working with a different material every day. Then, a whole week goes by and I have no completed projects to show for it! My needlework time is so spread out that though my mind is rapidly flying through all of these projects, my fingers can't keep up. I'm left with a half-dozen or so projects still attached to their yarn balls.

This is where my frustration resides this week. I am too ambitious and have gotten myself started on too many projects. I have a hard time settling on just one, especially if their are new techniques to learn, like knitting. I have successfully knitted one 12-foot scarf and am now ready to explore this avenue in needlecraft I have not really dealt with before. So, these new challenges steal my focus for a while.

I suppose I could choose to think positively about the whole situation. I could decide that, having started 5 projects almost simultaneously, perhaps I will have 5 projects finished simultaneously. I realize that this is a bit of backwards thinking as the time it will take to complete 5 projects much exceeds the time it would take to finish one, but I'm overlooking that for the moment. For my own sanity I will focus on seeing the potential for 5 finished projects waiting on the horizon.

There! I feel much better about the whole thing. I'm going to have 5 finished projects soon so no worries! I mean, as long as I don't undertake anything new... Oh, who am I kidding? :P


Thanks for reading,

~Paige


Saturday, March 31, 2012

The Assembly

Crocheted Koala Bear Keychain

Personally, I find the amigurumi assembly process one of the most humorous of crochet processes. I think I just about have to. If I didn't do it with humor, I would have to dwell on the fact that I hate sewing. I wish the pieces would all just crochet together. What is with this sewing stuff? I mean, I learned how to crochet so I wouldn't have to sew. Yet, here I am, attaching arms, legs, ears, and little bunny cotton tails with good old needle and thread. Maybe someday, when I am an old experienced crocheter, I will invent some way to make this easier. Until then, I must look on the task with humor as each little critter comes to life to justify the sore fingers and maintain my sanity.

First off, the heads are hilarious. Unless this was going to be a little grey alien man, this amigurumi looks nothing like the koala bear it is supposed to. It's amazing what a pair of ears will do for a crocheted animal. I remember the first time I made this guy I had serious doubts about the final product. It seriously looks nothing like a koala gear until it's got those ears. So, if I take a moment to gaze in amusement at the baldness of my little grey alien man koala bear wannabe, pulling out my tapestry needle becomes a little easier to deal with.


Second, why do animals have so many extremities??? Good grief. I get done making one arm and think, "Really? I have to make 3 more of these?" And that's not counting the ears, noses, and possible tails that must accompany the creatures. Whew! Lemme tell ya, crocheting into a round of a whopping 4 single crochets isn't my favorite thing to do. Nor is it a favorite of my left-hand middle finger, who gets frequently stabbed with the crochet needle during this process... However, after he finally gets all 384 pieces sewn on, (notable sarcasm), his adorableness makes it worth it. I take what I consider to be a short cut, however. I sew on the arms and legs BEFORE I sew the body to the head. Most directions I have seen for amigurumi say to sew on the arms and legs after the head is attached to the body. This drives me crazy! It's SO much harder to hide knots when you are working in the outside. So, I just do what seems natural and sew on all the little bits and pieces at the get-go and voila, seamless on the outside with a mess of secure and obnoxious knots hidden on the inside. (I typically sew the ears on before stuffing and closing the head. In this case, I got to the last few rounds of the head, attached the mouth, eyes, and nose, and realized I couldn't make the ears because I was still using the grey yarn to finish the head. Good plan. I know. Ideally, one would save some stress and knots by sewing on the ears ahead of time.)


I also find that when I sew the little parts to the bases ahead of time my fingers don't hurt as much from the tapestry needle. I don't have to do as much pushing and pulling when things are sewn on ahead of time. I also stab myself less, which I otherwise tend to do often... This is a real plus considering finger, hand, and wrist comfort are major issues when spending such a bulk of one's time crocheting - not that I'm addicted or anything...

So, when I have all of these things in place, a good laugh at the strange foreign no-ears character, the help of sewing on extremities before final assembly, and less painful fingers, making these adorable amigurumi projects is just a little bit easier :).

Crocheted Koala Bear Keychain


 Thanks for reading,

-Paige

Thursday, March 15, 2012

Crocheted Earring Obsession

 Another Creative Journey

Crocheted Earrings No. 5 - Purple Pillar Glitz
AS I've described on my Etsy page, I have this stitch pattern book. Yeah, it's one of those giant encyclopedia looking things that contains every stitch one could ever possibly desire to make. I love looking at these giant books. I get ideas and become inspired. That's when I start to regret that my crochet hobby is such a time consuming effort. I wish I could just make a list of everything I want to try and have it done in a weekend. However, it doesn't work like that. Instead, after spending hours and hours drooling over this book of stitches I finally decide on ONE pattern and there goes 2 weeks of my life. This is also due to the fact that I cannot stick with any one type of project. Not only do I need to make a scarf with this new stitch pattern I've picked out, but I also want to make ornament covers with crochet thread, hats, and gloves. So, I end up putting too many irons in the fire (I truly enjoy that phrase which I learned from a co-worker of mine) and I've only managed to work my way through ONE stitch pattern in this GIANT book. I can't help thinking about all of those stitches that have yet to be brought to life. So, I get all excited about making another scarf, but that's still only ONE more pattern I'll have completed and another 2 weeks go by. I needed to do something about this. I couldn't let all of those beautiful stitches go by the wayside. So, I developed my own personal take on crocheted earrings.

MY first design idea was really simple. It is essentially just a swatch of the pattern. I thought they would be fun and unique. However, I realized that if I only made these "swatch" earrings, things could get sort of boring. So, with ModPodge and crochet thread at the ready, I dug down deep in my creative chambers and came up with some alternative designs.


Crocheted Earrings No. 3 - Periwinkle Chip Glitz


MY next idea was to create a spiral. My stitch book starts out with a few really simple patterns using single crochet. I didn't want to create a whole Swatch Earring out of single crochet, but I also felt sort of like I was cheating if I skipped over a pattern. I'm determined to utilize EVERY SINGLE ONE. So, I decided I couldn't call myself a crafter if I didn't take advantage of this challenge. In order to make something interesting and exciting out of good 'ol single crochet, I used some metallic crochet thread, starched it in a spiral, and BAM! I would totally wear these on an evening out! This is the next problem with having an Etsy shop. I never make anything for myself anymore, :D. SO, hopefully these earrings will go to someone who is just as excited about wearing them as I am!


IN creating the spiral style, I had the idea for a tubular design. I was thinking sort of like paper maché wondering what I could use as a mold that I could "pop" when the starch solution was dry. I tried some things out and finally found something that works. These tube designs are fun and possibly my favorite.


THE above is the FINISHED product, but there was definitely quite the journey to getting there. I have a few reject earrings that were first attempts and didn't quite make the cut. The whole process is probably rather amusing to someone who actually knows what they are doing. For your entertainment, we will start on that journey...

FIRST, I had to do some research on starching. I didn't know the first thing about it and was worried I was going to need to purchase a lot of special supplies for it. I'm the kind of person who has the ideas to make these sort of things at 10 p.m. and no ability to wait for a supplies run to complete the idea. SO, I was determined to do some research and make do with whatever I happened to have around. Luckily, I found a website that provided a comprehensive list of all possible starch solution recipes with reviews. I found one I could use right then, at 10 p.m. I used the Crochet Memories website to find all of these recipes. I got my crocheted earring and started dipping!


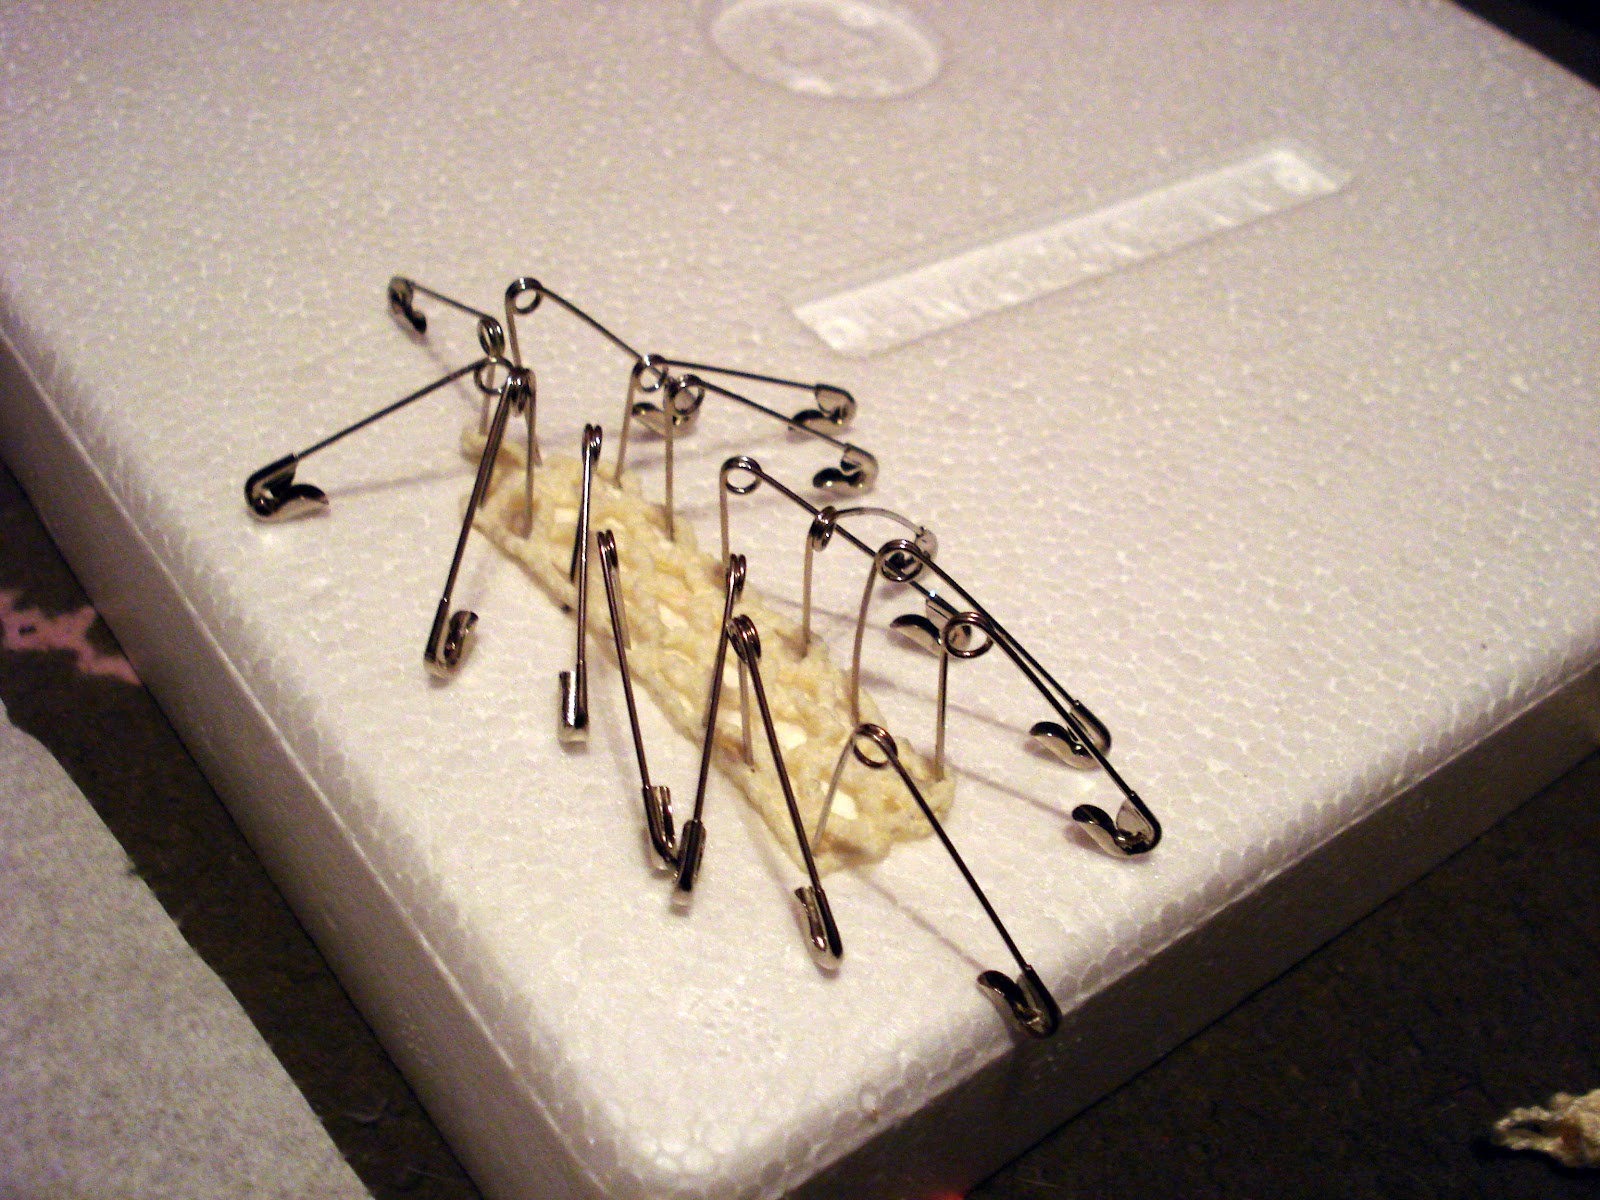
MY next issue was that I didn't have any rust free pins to use to stretch and shape the earring to be dried. Because of my inability to wait and procure the correct materials... I used safety pins. LOTS of safety pins. I found it interesting that I managed to have an entire bag of safety pins on hand, but no sewing pins. My crafting stash is apparently a very eclectic assortment of things.


NOW came the hard part. What was I going to get to be my mold for the tube earrings? This is what I chose and it was a HORRIBLE mistake! All of these starching solutions for crochet are basically glue. You get a watered-down version of some glue, slather it all over your project, wait for it to dry, and pry it off of whatever it is now stuck to, because it is undoubtedly stuck to something. I mean, it's glue, right? WELL, I had the bright idea to use my crochet hooks. It seemed like a perfect fit. The hooks were just the right size for my earrings. What I didn't think about was that when the glue dried the earrings would then be successfully and mostly likely permanently adhered to the crochet hooks. So, ignorant to my mistake and rather pleased with myself for getting this far in my project, I laid them out to dry, had a little giggle at the amusing picture of all of these safety pins jetting out of the Styrofoam, and went to bed.


AFTER a quick removal of safety pins I found that the swatch earrings came out pretty much as expected. I was happy with the degree of stiffness and with a little practice and actual sewing pins figured my next attempt will end up more uniform. 


HOWEVER, I get to the tube earrings and I become aware very quickly that I've created a glued crocheted mess on the end of my crochet hooks. Awesome. I end up having to grab some pliers and wrestle the things off of the hooks. It took some doing, but they finally came free. Needless to say, I did some rethinking in the execution of this design...


FINALLY, it was off to the jewelry station to attach all of the findings and figure out if these things were actually going to work. I learned some things about where to crochet the chains to hang the findings from. What I pictured in my head didn't really end up working out. I needed more jump rings than expected for this first batch because once I hung the fish hook, the earring was facing the wrong way! However, that is all part of the testing process.


NOW, I have a clearer idea of what to expect, fixed some bugs, and am making strides towards successfully completing a project using each of the stitches in my stitch book. Though right now I only have three designs dubbed my "Chip Earrings," "Pillar Earrings," and "Spiral Earrings," I'm sure it's only a matter of time before I'm up at 2 a.m. again trying to work with the wrong materials to glue something else together and ultimately come up with a new pattern!

I'M not typically the type of person to come up with artsy original ideas and am, therefore, really proud of this one. Most of the time I'm putting a spin on something that already exists or running with a concept I've seen and tweaking it a little. I feel like I can legitimately call myself creative knowing that these designs truly were not influenced by anything I've ever seen before. Now, that isn't to say these don't exist anywhere else. They very well could. I am just excited to have gotten there on my own, whether or not it was a technique already in practice, :). 

I'D love to hear about your original designs and your creative process!

Thanks for reading,

~Paige

Thursday, March 1, 2012

Crochet Epiphany No. 1


Stitches Too Tight...

OK, over the years in my time crocheting, I've discovered some, "tricks," for making crocheted life easier. Recently, in my amigurumi adventures, I discovered a way to make that first round in the magic/adjustable ring easier. I have a really, REALLY, tight crochet stitch which makes that first round super difficult. I could spend 10 minutes just trying to get my crochet hook through this TINY little stitch that I'm not even sure how I created. I've tried loosening up. I think to myself, when I make that notoriously obnoxious stitch, "Don't make it tight! You know you are going to end up throwing it out the window if you get to that stitch and it's tight!" However, it doesn't matter how loose I'm feeling or what nice relaxed thoughts I'm thinking, because I get to that first round and in that stitch I'm stuck.

SO, I cheat. My crochet hook is too big for the hole, so I get another hook. This took me a while to figure out because when I started crocheting I thought all you ever needed was 1 hook. I had a size G, teal crochet hook that my grandma had given me to use. I guess I saw that she had other hooks, but I obviously didn't think that much about it. This was MY crochet hook, and the only one I could ever need, right? (Interestingly, I had the same opinion about flutes before I got to college. There, I learned that like crochet hooks for crafters, musicians typically have more than one instrument. This was a major eye opening moment. Anyway...) Well, I was also living in the dark, dreary land of half-double crochet at the time, so with my ONE stitch and my ONE hook I just dealt with stuff. When the needle crafting world began to open up to me and my mom started crocheting these bracelets with thread, I realized I had been living in a crochet sock drawer all my life. So, I took a serious look at the craft isles in my favorite stores and realized those hooks weren't just aesthetic... they actually do different stuff! Now I have this whole wonderfully colorful assortment of crochet hooks to choose from, and those hooks allow me to cheat...

I'LL be the first to admit that the magic/adjustable ring is a beautiful thing. However, right after admitting that, I will incessantly complain about the initial stitch into said magic ring. It is completely and utterly obnoxious. I'm quite sure all of this is due to the fact that I have an inability to make stitches that actually allow anything of substance to pass through. So, this technique is for all of the crocheters that suffer from Stitches Too Tight - herein referred to as, STT...

My process begins with a magic ring, of course... I used 5 single crochet stitches for demonstration using a size F hook and Caron Simply Soft yarn. For more detailed magic ring instructions, check out this page: Magic Ring Link


NOW, the hard part. THE FIRST STITCH!!! Don't panic, grab a teeny tiny size 5 or 1.90 mm crochet hook and you'll be fine. Because that first stubborn stitch is just too darn tight for me,


I make sure that the tension on the F hook is tight, and grab my size 5 hook. Leave the F hook attached to your work, maintaining that tension, and insert the size 5 hook into the stitch in question.


Draw up a loop with the size 5 hook.


Make sure to open up a WIDE loop so you can fit your F hook into it.


Insert your F hook, tighten, and complete your single crochet.

THERE! You've done it! If you are like me you are overcome with emotion knowing that you didn't waste 20 minutes of crochet project time trying to jam your giant hook into a tiny stitch!

I use these little hooks for EVERYTHING. Whenever I need to pull multiple stitches through a tight spot or need to maneuver around something too tightly woven together, these small hooks save me TONS of time!

AT first, it seemed like more trouble than it was worth. I mean, you had to push your original hook out of the way, find the microscopic hook, (because it was never where I thought I left it and most likely somewhere underneath the cushions of the couch...) then hold all 400 things at once to make this little loop so I can get on with my crochet life. WHEW! However, after I did it a few times, I got a rhythm going. I figured out how to hold things and where to keep things handy, (not in the couch cushions), so that the cheat became worth it.

I'm sure I'm not the first person to do this, but I hope I can give someone somewhere some STT relief! :)

Thanks for reading,

~Paige

Saturday, February 25, 2012

Crochet Oops #1

There are always crochet, "Oopses." Sometimes, those oopses are good things. Like, the time I accidentally cut the thread on a crocheted flower too early. It was originally intended to be a pair of earrings. As I hate attaching things after the fact, I wanted to make the chain the earring would hang from right out of the ending thread from the flower. No sewing, because I HATE sewing. Anyway, I naturally cut the thread too short and was left with just a flower. No earring. So, what was I going to do with this flower? I turned it into a ring! Now, those rings are things I make all of the time. I never even finished my earring project because I was so pleased with the rings.

But then... there are the bad oopses... like this one:


Unfortunately, I was almost completely finished with this crocheted egg before I realized my oops. I suppose it really wouldn't have been an oops if I had realized it in time to fix it... Anyway, This is SUPPOSED to be a blue egg with pink and yellow stripes. Instead, it has one blue end and one half completed pink end, so the stripes now make little sense. When I went to pull out the pink on the end so that I could replace it with blue, the yarn knotted and broke. Thank you, baby soft yarn, for being so thin and breakable... As you can see, I was getting ready to close the egg, having stuffed it and everything already, when I realized my fate. Now, this egg serves as a reminder that when crocheting at 2 a.m., one must be a little more attentive...


Then, there are the oopses that are sort of, "whatever." This is one of those oopses. I found this photo while browsing My Flickr Account of some Easter Eggs that I really liked. I loved the color combination, and thought I could incorporate them into my own Easter Eggs.

Easter Egg Inspiration

So, I set out to create my own yellow and green Easter Eggs. Clearly, the photo shows my "planning" stages for the egg keychain. It is very well marked that I wanted the ends yellow with two white stripes and a green band in the middle.


However, when my brain went to pick yarn colors, I guess I decided that Y=Green and G=Yellow. I'm not sure why this happened. I mean, it was ME who created the design. It's not like I found it in a book and decided to tweak it. It was all me. If I decided the colors, why did I decide to screw them up... and right from the start? I mean, the STARTING color is wrong. It's not like the last crochet oops where my mistake at least happened LATER. No, I decided to ignore the pattern right from the get-go. When I was finished, I looked at my egg and my design and said, "whatever." This oops is relatively harmless. I mean, the colors are still there, it's just a little different. And, now I get to make another one with the CORRECT colors, :)


This crocheted keychain can be found on My Etsy Site


So, I've had a few oopses. I'm sure there will be more for your musings. I never cease to amaze myself with the amount of random wrongs I create. I just started knitting as well, which is an ENTIRELY different thing for me. Goodness. I'm sure I will have stories of that to share with you, too!

Question: Do you have oopses? What's been your best/worst oops?

Thanks for reading!

~Paige


Sunday, February 19, 2012

My First Amigurumi - a beginner's review

This was my very first attempt at amigurumi.

He was created on New Years Eve 2011. I remember because while all of my friends were gathered together playing board games and having a grand old time, I was at home sick with some kind of cold or flu. I sipped my theraflu and started on this little guy. I had just recently purchased my first amigurumi books and couldn't possibly wait until I felt better to crack open these books and dig in! I wasn't content with just looking at the pictures. It needed to happen, and it needed to happen whether I was sick or not. So, I started. I managed to finish his head before the theraflu kicked in. Then, four hours later, I woke up from my sleep and finished him off.

I was really surprised with how easy he was to make. Most creatures I've done so far are entirely single crochet. This stitch is like the first one you learn as a crocheter. Well, perhaps I shouldn't say that. When I learned to crochet, my grandma taught me the Half Double Crochet first. I didn't know it was an hdc until a lot later... a LOT later... but that is a different story entirely... So, they are all single crochet, and once you master crocheting in the round, it's a cinch!

The other really necessary trick to Amigurumi is the magic ring. *cue dramatic theme music* I used this link to find out more about the magic ring. Yes, it may be hard to seriously investigate a crochet technique called "the magic ring," but it is so worth it. At least, I had a hard time not laughing as I typed it in my google search bar. I thought for sure all of the search results were going to say, "Are you serious? Have you EVER crocheted before? That does NOT exist! :D Anyway, I have found out, also, that it can interchangeably be called an adjustable ring. I get super annoyed when I'm researching something and it has 400 different names. Hopefully, this will save you some trouble if you are looking for it as well. ANYWAY, the adjustable ring is WAY cooler than the other ways I've seen of doing it. The other instructions I've seen say to ch 2 and make however many stitches you need for the first row in the second chain from the hook. It makes a circle and everything, but the hole in the middle is HUGE. The point of using single crochet is to prevent stuffing from leaking out. If there is this gaping hole in the top of your project, it doesn't really matter that the rest of it is all nicely and neatly bound together. So, in my opinion, go for the magic, (hehe), or adjustable ring.

The other tid-bit I learned in my first Amigurumi project was to actually read the list of supplies before you leave the shopping center to create your cuties. I definitely didn't do this. This is why my poor purple bird has eyes that are made out of lots and lots of knots, and a beak (yes, I am aware that you probably didn't know it was a beak until now) that looks like nothing I've ever seen before. If I had read the supply list, I could have gotten beads for the eyes and felt for the beak. (I have a whole rant about felted accessories and bead eyes that I'll get to at some point) However, when I was finally able to begin the quest for cuteness and sit down to make this guy, I finally understand that I forgot to get materials. I'm lucky I had fiberfill lying around for the inside!

So, that's how I spent my New Year's Eve. There was no ball dropping, no champagne, and no confetti. I had a mug full of theraflu, a lap full of yarn, and the introduction to making some of the cutest crochet things I've ever made. Plus, I got a 4-hour nap! Perhaps this is how I will spend next New Years...

I'm happy to say my amigurumi skills have improved since this test-drive bird. Check out some of my finished products at My Etsy Site.

Thanks for reading,

~Paige

QUESTION: What crochet projects are you MOST proud of?